반응형
📍유저 데이터
const users = [
    {
        id      : 1,
        name    : "Rebekah Johnson",
        email   : "Glover12345@gmail.com",
        password: "123qwe",
    },
    {
        id      : 2,
        name    : "Fabian Predovic",
        email   : "Connell29@gmail.com",
        password: "password",
    },
];
📍게시글 데이터 형태
const posts = [
    {
        id: 1,
        title: "간단한 HTTP API 개발 시작!",
        content: "Node.js에 내장되어 있는 http 모듈을 사용해서 HTTP server를 구현.",
        userId: 1,
    },
    {
        id: 2,
        title: "HTTP의 특성",
        content: "Request/Response와 Stateless!!",
        userId: 1,
    },
];
📍게시글 리스트 응답 형태
{
"data" : [
{
"userID" : 1,
"userName" : "Rebekah Johnson"
"postingId" : 1,
"postingTitle" : "간단한 HTTP API 개발 시작!",
"postingContent" : "Node.js에 내장되어 있는 http 모듈을 사용해서 HTTP server를 구현."
},
{
"userID" : 2,
"userName" : "Fabian Predovic"
"postingId" : 2,
"postingTitle" : "HTTP의 특성",
"postingContent" : "Request/Response와 Stateless!!"
}
]
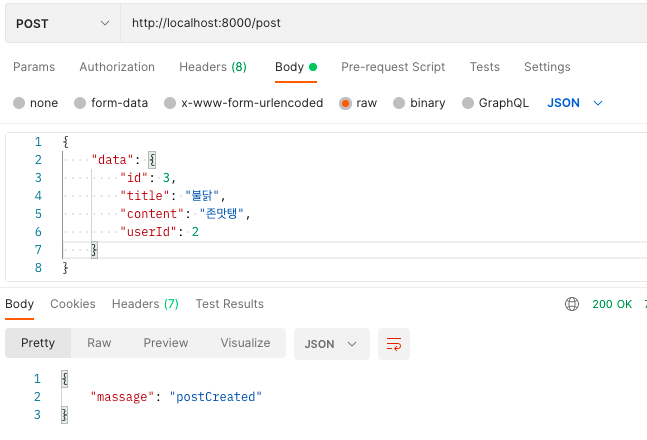
}1. 게시글 등록
게시글등록은 앞에서 만든 회원가입이랑 로직이 똑같다.
post.js를 따로 만들어서 작성했다.
post.js
const posts = [
    {
        id: 1,
        title: "간단한 HTTP API 개발 시작!",
        content: "Node.js에 내장되어 있는 http 모듈을 사용해서 HTTP server를 구현.",
        userId: 1,
    },
    {
        id: 2,
        title: "HTTP의 특성",
        content: "Request/Response와 Stateless!!",
        userId: 1,
    },
];

const createPost = (req, res) => {
    const {id, title, content, userId} = req.body.data;
    posts.push({id, title, content, userId});
    res.json({massage: 'postCreated'});
};

module.exports = {createPost};
app.js
const http = require('http');
const express = require('express');
const {createUser} = require('./user');
const {createPost} = require('./post');

const app = express();
app.use(express.json());

app.post('/signup', createUser);
app.post('/post', createPost);

const server = http.createServer(app);
server.listen(8000, () => {});
2. 게시글 목록 조회
게시글 목록은 그냥 posts배열을 리턴하면 되지만, 응답해줘야하는 데이터의 키가 다르고, 포스트 객체가 갖고 있지 않은 데이터인 유저의 이름(userName)도 넘겨줘야 한다.
post.js
const {users} = require('./user')
const posts = [
    {
        id: 1,
        title: "간단한 HTTP API 개발 시작!",
        content: "Node.js에 내장되어 있는 http 모듈을 사용해서 HTTP server를 구현.",
        userId: 1,
    },
    ...
];

const createPost = (req, res) => {
    ...
};

const getPosts = (req, res) => {
    const data = posts.map((post) => {
        const user = users.find((user) => post.userId == user.id);
        return {
            userId: post.userId,
            userName: user.name,
            postingId: post.id,
            postingTitle: post.title,
            postingContent: post.content
        }
    } );
    res.json({data: data});
}

module.exports = {createPost, getPosts};
각 포스트 객체의 키를 바꾸고, 유저이름까지 추가해서 리턴해주기 위해 map을 사용했다.
포스트 객체가 가지고 있는 userId로 유저의 이름을 알아내기 위해 users 목록을 user.js에서 가져와서 find메서드를 통해 user의 id가 post의 userId와 같은 유저 객체를 user에 담아서 userName을 뽑아냈다.
키 이름이 다 바뀌었기 때문에 나머지 데이터도 ...post를 사용하지 않고 알맞은 키를 새로 적어서 넣어줬다.
app.js
const http = require('http');
const express = require('express');
const {createUser} = require('./user');
const {createPost, getPosts} = require('./post');

const app = express();
app.use(express.json());

app.post('/signup', createUser);
app.post('/post', createPost);
app.get('/post', getPosts);

const server = http.createServer(app);
server.listen(8000, () => {});
테스트
post
get

반응형
'TIL' 카테고리의 다른 글
| LeetCode | 009. Palindrome Number (0) | 2022.09.28 |
|---|---|
| node.js | 인스타그램: 데이터베이스 구축 (0) | 2022.09.27 |
| node.js | express로 서버 만들기 - 회원가입 엔드포인트 만들기(DB x) (0) | 2022.09.26 |
| node.js | express 없이/express로 서버 만들기 (1) | 2022.09.26 |
| LeetCode | 001. Two Sum (1) | 2022.09.23 |